Back to my Jazz site index
Last change: 2019. Minor change: 2025-06-30, fix typo
Jazz Jackrabbit, TAS improvement ideas
Ilari, Mothrayas and slamo have TASed Jazz in 2014:
Episodes 1-6 TAS
and Episodes A-C TAS.
I (Simon N.)
have run Jazz RTA
since September 2016. I've found a couple of improvement
ideas over the 2014 TAS. I don't TAS myself and don't know if all ideas
will be feasible. If you'd like to give it a shot, feel free to ask
anything! (Contact details at bottom of page.)
General ideas
70 Hz framerate
Jazz has a feature/bug that makes Turbo difficulty gameplay run at 70 Hz
instead of the standard 60 Hz. I believe this was designed to be always
active, but it's only active in some conditions:
-
After a game-over, press yes (Y key) to continue.
-
During a normal level, press ESC,
quit to Main Menu, then start any episode. This won't work
every time, e.g., enter Diamondus 1, quit immediately, re-enter
Episode 1, you'll still have 60 Hz. I don't have an example
of how to trigger the 70 Hz feature this way, I merely remember it.
I believe this 70 Hz effect turns off after finishing one map.
But I haven't ever researched this properly, you might look into it again.
If it really lasts only for one map, it will likely be not worth it
to game-over or restart an episode merely to get 70 Hz.
It would be very sad to game-over deliberately or starting every episode
twice in a TAS, but I'm listing the 70 Hz feature for completeness. :-)
It would have been nice had Jazz always run at 70 Hz in Turbo difficulty.
Quick Death
When Jazz dies, normally, he turns into a dust bunny and crumbles. Then
the screen fades to black, then Jazz respawns.
Under certain circumstances (Frame rule? Input? Jazz's location relative
to a spike pit?) that I haven't been
able to pin down at all, the death animation is cut short immediately
to its last frame, and the screen begins to fade much earlier than normal.
This might save 3 seconds each on the death warps in Jungrock 1 and
Crysilis 2 (see below).
If you can pinpoint the cause of quick death, I'm looking forward
to hear from you!
Theory 2018-06-19:
It depends on the landing position in the
spikes. The Jungrock 1 spikes pit has a width of 2 blocks.
-
Quick Death GIF, here,
Jazz lands mostly on the right block, touching the left block
slightly.
-
Setup with level start
and cheat -- I haven't tested this for reliability.
RTA would also hit the first red beetle with a jump, I don't
know if that affects the setup.
Swivelling Trick
The swivelling trick prevents you from taking damage in most spikes.
Exceptions are the cacti in Turtemple because their damage event extends
very far above the solid tile, and spikes at ceilings or at walls
such as in Pezrock 1 and 2.
To perform the swivelling trick, press
and hold the jump key, and do not move at full horizontal speed while
jumping off spikes. For example, Jazz can jump straight up and down on
spikes without taking damage, letting go of the left/right key while
touching the spikes, or pushing the wrong direction while touching
the spikes.
I've called this trick the Swivelling Trick because I
originally discovered it by pressing the wrong direction quickly before
touching the spikes to damage boost, which, to my
surprise back then, avoided all damage.
I conjecture that this trick saves time in Orbitus 2 by skipping
the fallen star (see below).
Glitch Attack
When you have a shield, you can shoot enemies and hit them at the
same time with your shield. This destroys the enemy instantly and you
keep the shield. The 2014 TAS uses this in Deckstar and Deserto,
but didn't find this technique during Episodes 1-6. Maybe it's useful
here.
Map-specific ideas
Medivo 1
Press and hold down on your way towards the airboard.
This will scroll the camera down, affecting enemy spawn positions.
When you collect the airboard, the screen will be stuck down-scrolled
for the entire airboard ride, during which you cannot scroll the
screen at all. This might improve enemy spawn timings. The 2014 TAS
lost 2 frames to swords in the vertical ascent halfway through the
airboard ride; with the scrolled-down camera, these 2 frames can be saved.
I don't know if other swords become problematic.
During the airboard ride, you can shoot through a thin wall on the left
to kill a sword that you normally encounter after the airboard ride,
for swag. But this sword is never a problem and even RTA kills it
later easily without this trick, without losing any time.
During the airboard ride, before the half-way checkpoint, you
can dig downwards to 2 carrots by shooting breakable walls. RTA
uses Launchers to open this passage; it's also possible to kill the
first tile with RF-Missiles and only the subsequent tiles with Launchers.
Take care:
The Launchers' collision detection first makes them bounce off the floor,
only then kill a breakable floor tile if they're still inside such.
Thus, proper y-position during shooting Launchers matters.
This is probably the biggest time-save in Medivo 1 over the 2014 TAS.
Letni 1
BinaryBlob found a
faster jump to the first
springboards. This jump is very precise. We don't believe it'll be
good in RTA, but we haven't researched extensively.
Orbitus 2
The 2014 TAS takes the fallen star to get 15 seconds of invulnerability.
I conjecture that this is a time loss even though the TAS notes disagree.
Immediately after ignoring the fallen star, you have to shoot one
Beholder enemy, and TAS can do this without time loss. There are no
further enemies in the stage. There are two jumps off spike pits which
look like you have to take damage and hitstun, but the swivelling trick
works: See near top of this page, or watch an RTA run perform the
second swivelling trick after grabbing the bird.
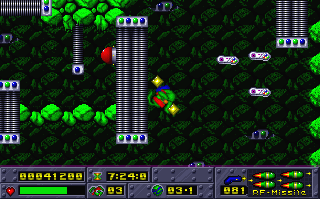
Megairbase 2
Look at the screenshot. We clip through diagonally adjacient blocks,
from the bottom to the top. This happens in the shoe-collecting
section. Normally, you travel into a dead end, collecting shoes,
then travel back out. This clip minimizes travelling back and forth
over the same path.
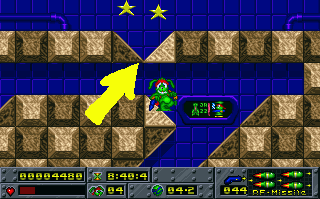
Turtemple 1
Look at the screenshot: This area is immediately after the half-way
checkpoint. You can clip through the half-block-thick ceiling,
at least with Hard/Turbo speed shoes. It might be necessary to touch
the corner of the rightmost floor step below.
Twitch clip of the Turtemple 1 ceiling clip
Jungrock 1
Enter this stage without shield. Lose 2 health to the first enemy
and the second spike pit. TNT the half-way checkpoint through the
wall. Die (either off the worm or off the spike pit) and thus warp
to the half-way checkpoint.
See also the section on Quick Death earlier on this webpage.
geoo had the idea for this death warp. I have then tested its
variations for RTA and switched Episode 4 from Medium to Hard to make
it even better.
Dreempipes 1
RF-Missiles shot towards the left spawn very far to the left of Jazz.
You can shoot the red switch in the screenshot (the particular switch
that the 2014 TAS shoots after getting the shield)
thorugh the wall from the right
instead of climbing into the switch's narrow alcove.
Shooting this switch through the wall has become standard in RTA.
Dreempipes 2
You can shoot the fast-feet upgrade through the wall from the right,
either with RF-Missiles or with Toasters. This way, you don't have to
enter the long dead-end to get the fast feet.
With Toasters, you must stick your head further into the wall than
with RF-Missiles, therefore RTA uses RF-Missiles.
Crysilis 2
If you have RF-missiles, you can shoot the half-way checkpoint through
the wall, then die and thereby warp to the checkpoint.
Only 2 of the 6 (?) possible x-position alignments against the
wall allow you to shoot through the wall, and getting the right
y is again tricky.
See also the section on Quick Death earlier on this webpage.
For this death warp, only RF-Missiles can shoot through the wall;
you cannot stick your head deep enough into the wall to fire Toasters
through.
The easiest RF-Missiles to collect are likely those in Pezrock 2,
near the bottom-left-hand corner of the map, before you damage-boost
through the 3 spike pits with moving platforms.
This is too volatile for RTA and I conjecture that perfect execution
saves 1 second in RTA on Easy across the entire Episode 6, even though
Crysilis 2 itself becomes shorter by 5 to 10 seconds.
Reason: The death warp skips the cache of RF-Missiles
in the top-left corner of Crysilis 2. RTA needs RF-Missiles to kill bosses,
but TAS can mash Blasters in a pinch, losing far less time than RTA.
Choose Jazz version 1.3 for A-C
The 2014 TAS plays on the good 1.2 version of Jazz. Alternative
choices are the bad 1.2 and the 1.3.
See version differences. They avoided the 1.3
for fear of missing airboard ditches, but all versions have working
airboard ditches.
The bad 1.2 or the 1.3 might be faster to run because in Ceramicus 1,
after the first patch of carrots, you reach a spring yard. The aim of this
section is to jump over a pole at the right. This pole is shorter by one
block on the bad 1.2 and the 1.3 than the pole on the good 1.2 that
the 2014 TAS used.
Deckstar 2
Look at the screenshot. After the long diagonal ascent
in the fast-feet section, you can jump through a thin part of a
45-degree slope with air underneath.
This cuts short the last 20 % of the level.
According to Ilari, the clip will cut 7.95 seconds off the 2014 TAS.
Video of the
Deckstar 2 ceiling clip with fast feet,
the trick happens at 15 seconds.
Deserto 2
The 2014 TAS notes say: [12:03] There is NO mercy invincibility
from killing an enemy with a shield, so the two lizards here cause 2
damage. -- You can run into the spikes here, that gives mercy
invulnerability and loses the bird, but keeps all 4 shields.
But touching spikes may cost 1-2 frames though for a suboptimal jump
arc -- you'd have to research this. Overall, the 2014 TAS is fine
in Deserto 2 with health, thus frames may be more important than
keeping the maximum possible shield.
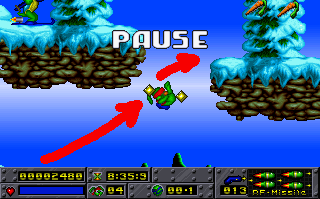
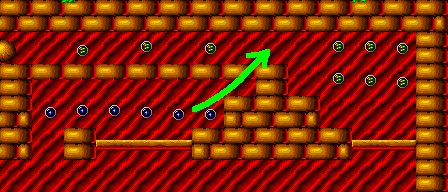
The
2010 TAS
jumps off a red spring to the island in the sky with the skiing turtle
(top left in the screenshot),
then runs from that island to the second island with
carrots (top right in the screenshot).
Instead, before you touch the red spring, you can turn right below
the island with the skiing turtle and jump immediately
from a downslope to the island with carrots
(red arrow in the screenshot).
Thanks to
Dominator_101
for finding this!
This saves about 0.5 seconds. We use it in RTA.
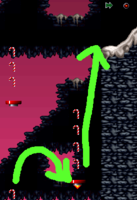
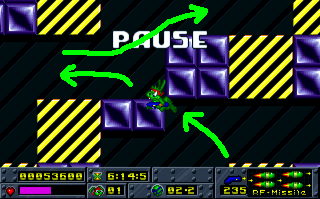
You can skip the 4th spring in the springshaft near the end of
Holidaius 2. Hold arrow-down
on the keyboard while you're flying from the 2nd spring to the 3rd
spring (bottom arrow in the screenshot). Release arrow-down before
you hit the 3rd spring. If the stars align, you'll fly up to the
snowy ledge.
Again,
Dominator_101
found this, and it saves nearly 1 second. It's a gamble in RTA,
but we still attempt it.