Last update: 2021-08, Crysilis 1 ending
Back to my Jazz site index
Speedrunning Jazz Jackrabbit
Jazz Jackrabbit (Epic Megagames, 1994, DOS, platformer) is a speedy, colorful action game unlike any other for the PC. To play Jazz, you must understand three rules:
- Run like the wind.
- Shoot everything that moves.
- If you can't shoot it, take it.
I (Simon) have been speedrunning Jazz since September 2016. Watch my best run:
Contact me -- Send email: eiderdaus at the gmail.com. Alternatively, join twitch chat during my streams, whisper on twitch, or comment on youtube. :-)
General tips
DOSBox cycles -- Everybody on the leaderboard (the 3-5 people who've ever run Jazz...) use DOSBox.
Cycles in DOSBox matter! We have decided to run at 40,000 cycles. This almost matches Vortale's old runs from 2013 and 2014, it might be minimally slower, but guaranteed not to be faster. The cycle count affects the loading times between the levels, and the menu fading. The run measures time spent in the menu, so this is important.
Boss scrolling -- After a boss loses all its health, it explodes for a few seconds, then the screen scrolls slowly towards the boss's top-left corner. Only when the screen has finished scrolling there, the score will count down.
To cut short the slow centering on the boss, during the boss's explosion, stand within the boss, aligning Jazz's left sprite boundary with the boss's left sprite boundary. If the boss is taller than you, jump repeatedly to reach its top-left corner.
Score countdown -- After you shoot the exit sign or kill a boss, mash blasters. After a second or two of score-counting, shooting will abort the counter, saving time.
Bridge dissolution
Suspension bridges can dissolve during play. If you're standing on a dissolving bridge, you will fall.
This section describes my theory. I have not looked at the game's memory,
I have merely investigated many cases.
Still, this theory has properly predicted all cases so far that I tested.
Jazz 1 has a cache for 4 suspension bridges.
It deallocates bridges properly when
-
you leave the screen (but you must go 0.5 to 1 screens onwards past),
or
- you die with the bridge on/near the screen.
Jazz 1 fails to deallocate bridges,
and thus lets them clog the cache that has a maximum size of 4 bridges,
when you the bridge is still on/near the screen, and
-
you win a level by shooting the exit sign
(happens, e.g., with the final bridge in Diamondus 1), or
-
you game over, or
-
exit by esc-quit-to-main-menu.
When the cache is full, the 5th bridge overwrites the 4th. Thus, with a full
cache, whenever a bridge appears on screen, that new bridge makes the 4th
bridge dissolve.
Non-deallocated bridges clog the array (that takes 4 bridges max) until you exit to DOS. When Jazz 1 starts from DOS, it allocates a memory pool that is
properly zeroed, that clears the bridge cache.
Now, the culprit that threatens runs is the final bridge in Diamondus 1!
It stays in memory after you win Diamondus 1 because it's so close to the
exit sign. If a bridge fails to deallocate, it remains in memory until
we exit to DOS. In Turbo 9-episode runs, this last Diamondus 1 bridge,
together with some other bridge that must be in memory during episodes
1-6 and A, eventually kills the 3rd bridge out of the 4-bridge-batch in
Muckamuk 2, nearly an hour later.
Terminology
checkerboard clip -- In Dreempipes 1, you can swim through diagonally adjacent solid blocks, saving 5 seconds. Diagonal clip was my old name for this, but I want to disambiguate between the checkerboard clip and the triangular clip. The TAS performs another checkerboard clip in Pezrock 1, but I found that too unreliable for RTA.
swivel -- Fixing slightly-offset jump arcs during the jump. While you jump or fall and hold a horizontal movement key, let go of the key shortly, maybe even press the opposite direction shortly, and then continue holding the original key.
triangular clip -- A sequence break in Deckstar 2. You can jump through a thin floor made of 45-degree slopes, saving 15 seconds. Deckstar route with thorough description.
Routes
Medivo 1
Near the end of the level, you run through a 1-block high corridor, then arrive at a series of swinging black balls. If you drop into the hole after the corridor, you risk bumping the wall on the right-hand side of the screenshot.
Ideally, you jump out of the corridor at full speed, but that is hard. We haven't found a consistent setup.
BinaryBlob had this idea: Slow down slightly when you get out of the tunnel. That way, you may be able to preserve your momentum and jump from the hole without hitting the wall.
Letni 1
BinaryBlob found a faster jump to the first springboards. This jump is very precise. We don't believe it'll be good in RTA, but we haven't researched extensively. It improves the 2014 TAS.
Technoir 1
After you shoot the bird cage, you fall leftwards to a floor with a turtle.
If you hold left here and otherwise do nothing, you'll ram the turtle, which
is bad. The 2016-2019 routing tells you to swivel right to avoid the turtle,
i.e., to push right shortly, then continue to hold left. The problem is that
the swivel loses time. Better idea 2020-02: Hold left and down, and spam
Launchers from the peak of the fall. The launchers will kill the turtle.
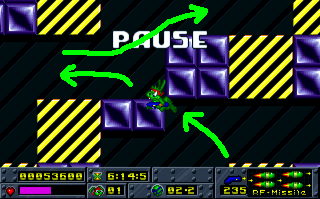
Megairbase 2
Look at the screenshot. We clip through diagonally adjacient blocks,
from the bottom to the top. This happens in the shoe-collecting
section. Normally, you travel into a dead end, collecting shoes,
then travel back out. This clip minimizes travelling back and forth
over the same path. If you want to use this in RTA, please
research more. Right now, I deem it too slow.
This is a shorter, potentially faster route to
improve on the 2014 TAS. I've only tested this without fast feet. If it
doesn't work with fast feet in a good way, then the TAS won't
benefit.
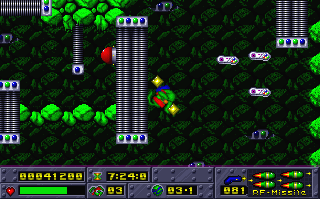
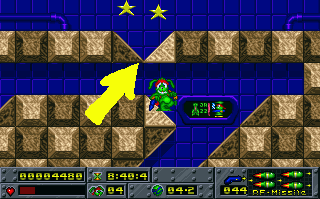
Nippius 1
Near the start of the level, you can make a precise hop across a pit.
Don't do this in RTA -- it's too risky.
Look at the screenshot. Run towards the right at full speed. When you're
in the yellow box in the screenshot, do a small hop, by tapping the jump
key for as short as possible. Keep holding right all the time.
Don't jump too close to the edge, too far from the edge,
or too high. The ceiling prevents any deviations from the optimal jump and
makes you fall down, which loses about 1 second.
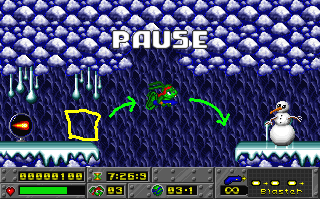
Dreempipes 1
The water-raising switch behind the rod can be hit from the right, through the 1-block-thick wall that separates Jazz from the switch in the screenshot. Jump against the wall and fire RF-missiles against the switch. Toasters work too, but RF-missiles seem best.
I've tested this on 2017-01-01 in the Floppy version, but it'll probably work in the CD versions. slamo confirmed that the TAS team hasn't known this before.
When you shoot the switch through the wall, you don't have to enter the narrow alcove with the switch anymore. Because the water needs time to rise, you now have to wait where Jazz is in the screenshot, but that's very much acceptable. Maybe experiment with hitting the intermediate switch before hitting the described switch.
Pezrock 1
For 2016 holiday presents, Pezrock 1 got 4 improvals:
- Wait before first boost makes everything safer and is free, because I'd wait later otherwise anyway.
- Fast method to jump through gap with horizontal clams just before the half-way checkmark: Jump as soon as possible while running up the slope, then hold right.
- Use springboard below the first moving platform instead of riding moving platform. Almost always faster, unless you get to ride the platform immediately after arriving there.
- The largest gain? A gain at all? We have to measure this. Skip invincibility unless on blinking health. Damage-boost off the second spikeball that you encounter.
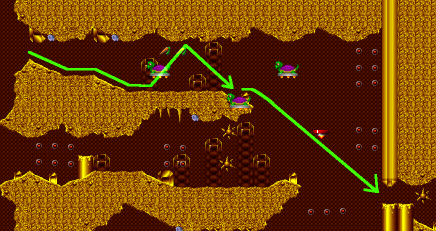
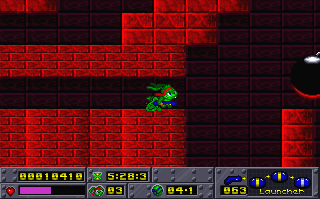
Crysilis 1
The image shows the final room of Crysilis 1 before the
chamber with the exit sign; that sign would be to the right of the image.
Jazz enters this big room from the top.
Run along the horizontal green arrow, spamming Launchers to kill
the two highest flying turtles.
Jump at the first crystal pillar in the background, aiming to collect
only the right carrot. This jump avoids the turtle that is flying inside
the floor; this turtle is hard to shoot. Strat is still
experimental, strat still hits that turtle too often.
At the end of the floor, don't jump; instead, run off to the
right at full speed. Do not hold down either. Merely holding
right is enough to slip exactly into the one-block-high nook that leads
to the exit sign chamber.
Raneforus 2
There are at least two competing strats here, with implications reaching into Stonar 1.
Invincibility strat: From the large tree at the beginning, take the invincibility and the fire shield. Don't take any TNT. Because you took the invincibility, kill the monkeys near the end of Raneforus 2 with the shield. In Stonar 1, get the fire shield using toasters.
TNT strat: Don't take the Raneforus 2 invincibility, but take TNT instead on the airboard ride. The necessary extra airboard ascent is very slow. Immediately blow a pack to get a fire shield. Use the shields and some TNT on the monkeys near the end of Raneforus 2. In Stonar 1, get the fire shield using TNT.
Maybe it's possible to forego both the invincibility and the TNT, and play Raneforus 2 like the TAS.
Deckstar 2
You can jump through a thin part of a 45-degree slope with air underneath. This cuts short the last 20 % of the level, saving 15 seconds. I call this exploit the triangular clip.
Have fast feet, or don't have fast feet, either works. You arrive here with fast feet, but if you fail the triangular clip several times, fast feet will time out. You can nonetheless attempt the triangular clip.
Strategy with fast feet:
- Stand in the dead end at the right side of the screenshot -- not where Jazz is standing in the screenshot, but instead all the way back at the right.
- Press and hold left. Immediately after (about 1, 2, or 3 frames after, I think; the game runs at 60 or 70 fps), press and hold jump. Continue holding both left and jump. You will run and jump towards the left, hitting the dark 45-degree slope indicated by the arrow.
- You should clip through the floor and collect the stars in the screenshot. Only release the held keys now, not before.
- If you don't clip through, go back to the dead end at the right, try again. Experiment with simultaneous pressings of jump and left instead, or reversing their order, instead of what I wrote above in item #2.
Strategy without fast feet:
- From the bottom right in the screenshot, jump leftwards onto the light 45-degree floor on which Jazz is standing in the screenshot. This landing position is reasonably precise. Keep holding both left and jump.
- Jump again immediately when you land where Jazz is standing in the screenshot. This second jump should bonk your head against the dark 45-degree slope indicated by the arrow. More precisely, you hit this 45-degree slope near its right end, but not exactly at the end.
- During this second jump, stop holding left. Maybe hold right now, but I'm not sure.
- You should clip through the floor and collect the stars in the screenshot.
- If you don't clip through, go back to the right, try again.
Video of the triangular clip with fast feet, the trick happens at 15 seconds.
The 2014 TAS by Ilari, Mothrayas, and slamo didn't use the triangular clip. According to Ilari, the clip will cut 7.95 seconds off the 2014 TAS.
What doesn't work: Standing jumps below the 45-degree slope, or slowly walking back and forth underneath while holding the jump key.
Deserto 1
After the first triplet of devils, there is a secret cave with a fire shield and invincibility. Is it worth the time to take these? I'd rather not take these and damage boost more instead, but I'm at a loss to decide. Do I love damage boosts too much?
Back to my Jazz site index